What are Custom Fields
Custom Fields, a new feature of Joomla! 3.7, allow us to create articles with stable structure and appearance. In addition to the main fields, such as the title of the article and the body, the articles author has in his disposal pre-configured -by the web site administrator, fields to enter additional text. Thus, on the one hand, it facilitates the organization and grouping of information related to the article, on the other hand it ensures the consistent and uniform appearance of the articles to the viewer.
What custom fields are available?
In Joomla 3.7.x version, 15 classes are available. For our example we will use some of them.
- Calendar Field (Select date)
- Checkboxes Field
- Color Field (επιλογή χρώματος)
- Editor Field (Select text editor)
- Integer Field (number field)
- List Field (select predefined values)
- List of Images Field
- Media Field (access to media manager)
- Radio Field
- Sql Field (values retrieved by an SQL query)
- Text Field
- Textarea Field (long text field)
- Url Field
- User Field (Select user)
- Usergroup Field (Select user group)
An example: Create Annotations
Suppose we have a series of articles commenting ancient writers quotes. We will create this page.
STEP 1 Create fields and group of fields
Assuming we have administrator rights, join the joomla back end and create the group that will keep together the fields. Field Group is optional but useful for better organization of our data:
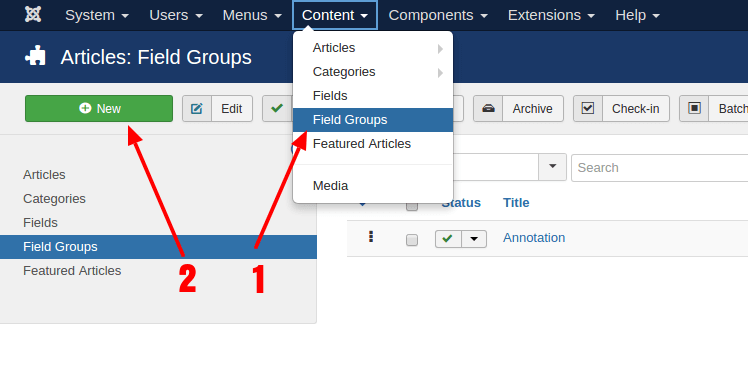
1.1 Group fields
- Menu > Content > Field Groups 1
- Select New 2
1.2 Fields
- Menu > Content > Fields 1
- Select New 2

According to the fields we want to create, we enter the following minimum required settings:
| Field of ancient text It will host the verse in its original form. Hyperlinks are allowed | |
| Title | Ancient |
| Type | text area |
| Filter | Raw (Necessary to import hyperlinks) |
| Field Group | Annotation |
| Translation field The translation of verse into current language | |
| Title | Translation |
| Type | text area |
| Field Group | Annotation |
| Book Title Field The title of the book in which the verse is located | |
| 1 Title | Book Title |
| 2 Field Group | Annotation |
| 3 Type | list |
| 4 List values | Text Value Republic Republic Symposium Symposium Apology Apology |
| To create more lines in the list, select the green button 5 | |
| Book Chapter Field & Verse Field Two additional fields containing the chapter number and the verse | |
| Title | Chapter [or verse, accordingly] |
| Field Group | Annotation |
| Type | list |
| List values | Text Value 1 1 2 2 3 3 … … |

STEP 2 Create an article
Create a new article:
Menu > Content > Articles > Add new Article 1

and enter in the body of the article only the ancient text with the annotations. Then create – if you have not done it already – the corresponding anchors and hyperlinks.
Notice that a tab named Annotation 2 has been created, which includes the fields we created and in which we can add the other data.
In Ancient Text field, copy and paste the html code of the ancient text 3 so that the hyperlinks are also inserted. We recall that in the specified field the value in the filter is raw. (Access to html code depends on the text editor you use in Joomla).
Delete the ancient text from the body of the article, as it is now redundant, and save the article 4

STEP 3 Fields Appearance
To improve the appearance of the fields, we can make the captions of the fields bold and color the background of the ancient text.
A. Enter the following css code into the custom css file of the template that you use in Joomla. (It is out of our scope to explain how to create custom css files and integrating them into templates, regarding the Gantry5 framework we use, see the documentation).
.sz-background {
    background: #9bdaf1;
    padding: 0.5rem;
}

span.field-label {
    font-weight: 800;
}
B. Associate the sz-background class with the ancient text field:
- Go to Menu > Content > fields 1
- Select field Ancient 2
- Select tab Options 3
- Inside Render Class field enter the class sz-background (χωρίς την τελεία) 4
- Save


STEP 4 Show the fields in side column
In order to recreate the example, the template must be at least 2 column. In our case we use three columns, one central and two right and left with the following widths: 25% – 50% – 25%.
Each template has its own way to implement it. Prometheus template incorporates the Gantry5 framework technologies and allows us to configure our page structure with drag n drop functions using preconfigured media queries.
After creating 25% width left side column, enter the following code into template’s custom css file. What we do, is to move all the fields to the left of the screen unless the viewing medium is tablet or mobile, in such case the fields are not moved, instead they are displayed in their default position.
dl.fields-container {
   @include breakpoint(desktop-only){
       position: fixed;
       top: 100px;
       left: 2rem;
       width: 25%;
   }
}
STEP 5 Reset fields to original position
One last touch is missing for the smooth appearance of the fields. If we display multiple articles, one below the other, as in the Category Blog, Category List view or Featured Articles, then the fields should be displayed in their original position – or completely hidden if you prefer. Otherwise they will all appear together on top of each other. The following code returns to their original position. If you want to hide them completely, then uncomment (remove the double //) from the line display: none
div.blog-featured dl.fields-container,
.view-category dl.fields-container {
    // display: none;
    position: static;
    top: 0;
    left: 0;
    width: 100%;
}
Final format of our css code
Our code in custom css file (customized for templates based on Gantry5 framework) has the following final format. If you try to reduce the width of the window so that it gets mobile dimensions, you can see the fields being moved to the top of the article.
@import "dependencies";

//move fields to left side
//when viewport is not mobile or tablet
dl.fields-container {
  @include breakpoint(desktop-only){
       position: fixed;
       top: 100px;
       left: 2rem;
       width: 25%;
   }
}

//return fields to normal position
//when menu item type is featured articles categories view
//aka when more than one article are displayed
//If you want to completely hide the fields
//uncoment display: none;
div.blog-featured dl.fields-container,
.view-category dl.fields-container {
    // display: none;
    position: static;
    top: 0;
    left: 0;
    width: 100%;
}

//make colored background
.sz-background {
    background: #9bdaf1;
    padding: 0.5rem;
}

//make fields labels bold
span.field-label {
   font-weight: 800;
}